# Rendering UVs from Yeti's Alembic files.
Heads Up!
This is not required anymore as of Multiverse v6.6.6 (2021-01-13) as we changed
the primvars:st type from float2 to texcoord2f. This grants a matching
compatibility with Houdini and is also future-proof with upcoming versions of
USD were texcoord2f is the recommended choice.
Yeti is a popular plugin for grooming fur in Maya. Older versions of Yeti exported curves to Alembic with UVs represented by three coordinates, "UVW".
In this post we will transform the UVs to two coordinates using Houdini, then convert the curves to the more efficient USD format. Ultimately we will bring them back in Maya via Multiverse to efficiently render them, procedurally.
Note
Because animated curve files can be potentially large considering the number of frames in animation that one may want to render, it is important to keep the size of USD files to the minimum. This means getting read of any unnecessary attributes before writing the USD files, especially attributes that are part of "big array data" such as the third float (W) in UVW.
Thanks to USD excellent binary compression the file size and read performance will be greatly reduced too.
# Requirements
- Maya 2018+
- Yeti (older versions)
- Houdini 18+
- Multiverse | USD <= v6.6.6
- A Multiverse-supported renderer
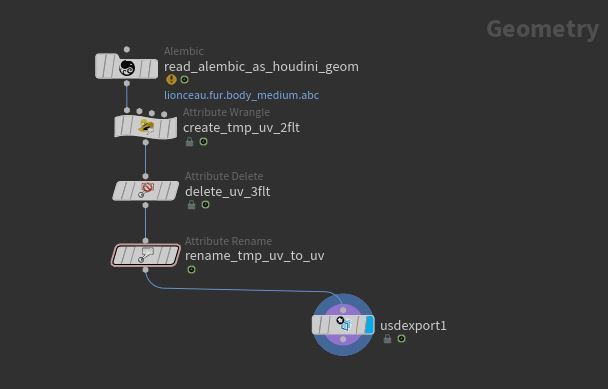
# Changing Yeti's Alembic UVs on Curves
We will assume you have a Yeti Alembic cache with UVs written.
Yeti exports its fur to Alembic and writes the UVs for each curve primitive,
however it writes them as 3 floating numbers (3flt). This is wrong, so we will
use Houdini to convert them to 2 floating numbers (2flt).
Basically we want to go fro this:

To this:

Everything can be done in SOP, there no need to use Solaris here:
- Create a
Geometrynode, dive in and create andAlembicnode where you will load your Yeti-generated.abcfile. - In the Alembic node set the "Load As" to: "Load Houdini Geometry"
- Add a
Attribute Wrangleand store the UVs to a temporary variable with this snippet of code:
u@tmp_uv = set(@uv.x, @uv.y);
- Add a
Attribute Deletenode and delete the original UV primitive attributes (3flt) - Add a
Attribute Renamenode and rename the primitive attributetmp_uvtouv.
# Converting the curves to USD
It's time to write out your Houdini work, we will continue from the previous section with the numbered steps:
Add a USDExport node:
- 6.1 In "USDExport> Layer Metadata" make sure to select a USD default primitive" (you can use the pull-down to select it).
- 6.2 Set the output filename and write out your
.usdbinary file
So, finally your SOP Net should look like this:
Note
On a production groom, we reduced the size from 1.24GB (Alembic) to 400MB (USD).
# Read the curves in Maya with Multiverse
Now you are ready to bring the data in Maya:
Multiverse Read USD to load your Houdini-generated USD file
Open Multiverse's MEOW and verify that the data type of UVs is correct. To do so, just like in Houdini, simply MMB on a curve item to see its contents, or LMB and choose "item info":
primvars:uv float2[...]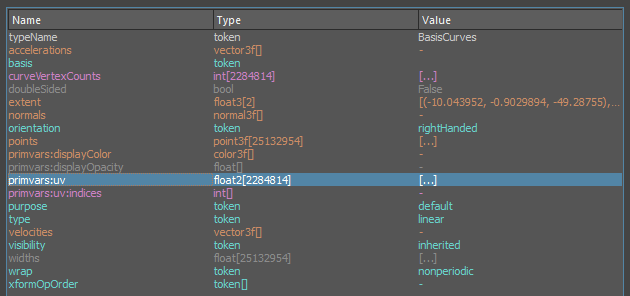
Assign a material to your curves and apply a texture to the color channel.
Render, you should see your fur color texture respect the UVs.