# Multiverse pipeline
This document describes a non-destructive example pipeline where work can be executed in parallel by multiple artists. It generally starts from Maya and shows the flow of files passed through the pipeline and between different DCC applications, though it outlines a workflow that is Maya-centric and which interchanges with Houdini (Solaris) and other DCCs.
Note
This is an example pipeline to be used for reference only purposes. Some areas could be expanded, consolidated or removed, we could describe other pipeline processes more in detail and and many additional connections could be drawn in the diagram. However, the objective is to keep things simple and provide a basic reference which flows top-down, as ultimately every pipeline is different and is tailored around very specific (your) needs.
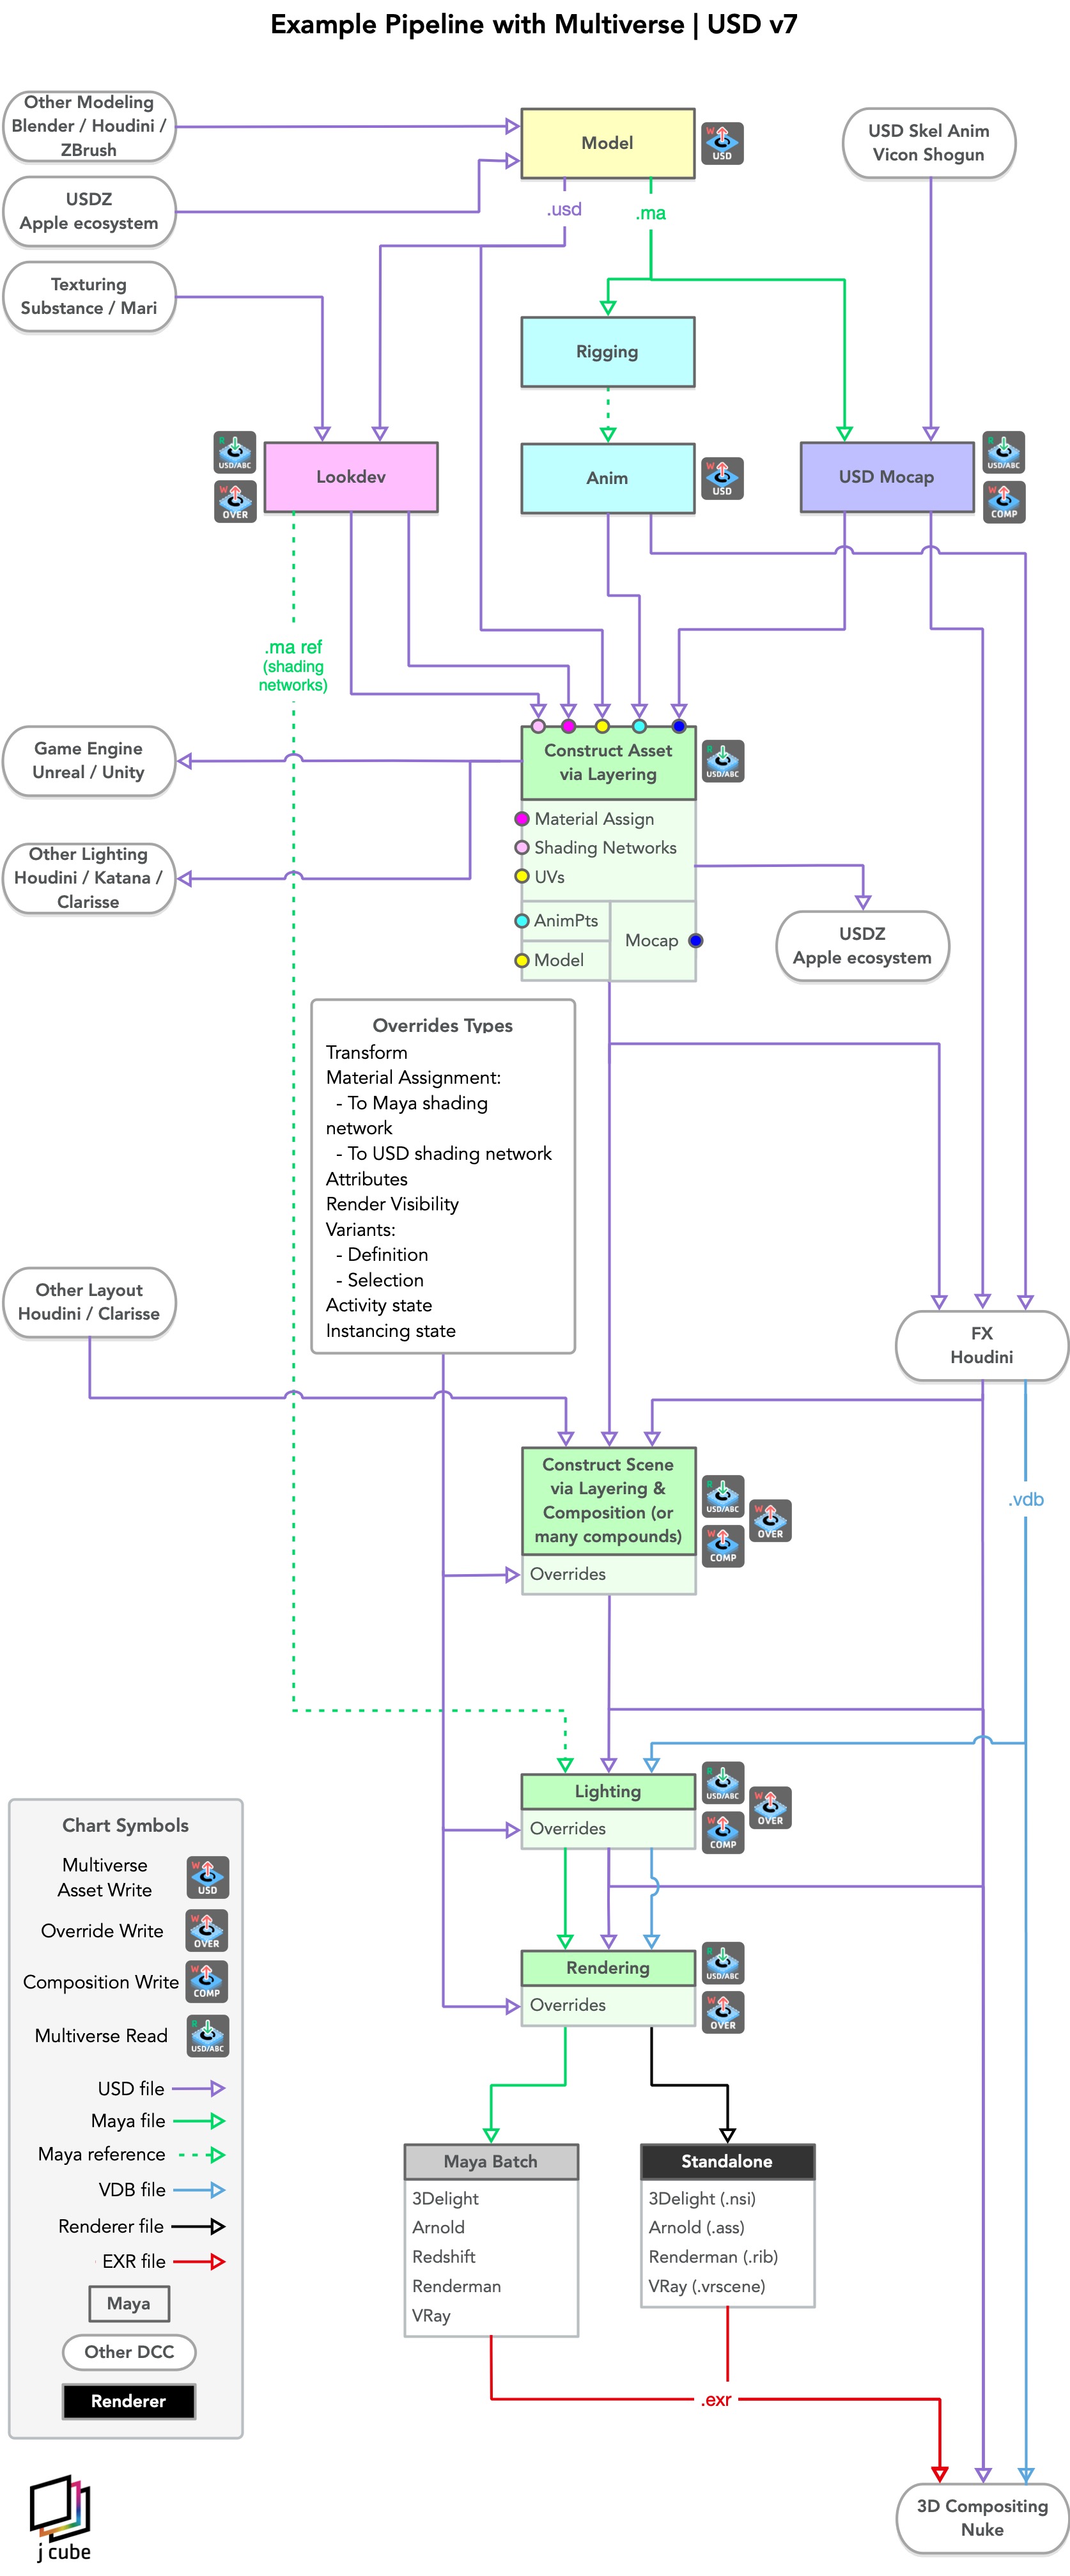
Let's first have a global overview by looking at the following flowchart, then read a more comprehensive description for each step:
# Modeling
Modeling is one of the most important step of every pipeline as it defines the origin of data and the blueprint for the assets.
The modeling tasks are:
create a model topology (this can be either static or in "rest pose" for animation)
define which objects are subdivision surfaces
TIP
Normals ("N" data) is not necessary if your geometry will be rendered as a subdivision surfaces because subdivision surfaces will generate new normals at rendertime. Normals represents big array of data, especially when animated. It is therefore wise to tag your geometry as subdivision surface using Maya Smooth Proxy: Multiverse will automatically skip writing "N" data if a mesh is tagged as a subdivision surface.
Create UVs
Create materials for display color purposes
Define hierarchy variants
Define attribute variants
Create custom attributes for animation purposes or needed in other steps or other DCCs.
Create USD preview materials for purposes such as preview, AR (USDZ) and basic interchange between DCCs. These will be embedded in the USD file that the Modeling writes.
The outputs of the modeling phase are:
a static / rest-pose USD asset file (
model_asset.usd) that is passed to Lookdev, Anim, Construct Asset and FX.a USD override file for updated UVs written as sparse overrides to be used as layers (
uv_over.usd) that is passed to Lookdev to Construct Asset and to FX.a static Maya file (
model.ma) that is passed to rigging and animation and to mocap.Note
Modeling can also interchange USD data with other modelers such as Blender, or procedural modelers such as Houdini.
In the modeling phase you will use the following Multiverse tools:
- Write USD Asset -->
model_asset.usd - Write USD Asset (as sparse override) -->
uv_over.usd
# Lookdev
Lookdev uses as input data the model.usd and uv.usd files generated by
modeling.
The Lookdev tasks are:
- Create material shading networks. This also includes creating conditional logic to query primvars attributes in shading networks for lookdev variations.
- Assigns materials to the various item in
the
model.usdwith MEOW. You can assign:- Maya materials (shading groups terminals of your Maya shading networks)
- USD materials (shading groups terminals of your USD shading networks)
- Assign a material namespace to the root
item in the
model.usdwith MEOW. - Create basic lighting for testing the look of the asset
- Perform test renders
- Define the look of attribute variants by switching material assignments by name or by primitive variables.
- As of Multiverse 7, embed shading networks to USD to be used for both interchange and direct rendering with NSI.
The outputs of lookdev are:
- a USD file containing material assignment and namespace to be use as a layer
(
mat_assign_ns_over.usd) that is passed to Construct Asset OR a USD file containing material assignment and shading networks to be use as a layer (mat_assign_shadingnetworks_over.usd) that is passed to Construct Asset. - a Maya file (
mat_networks.ma) that contains material shading networks which is Maya-references that is passed to Lighting.
In the lookdev phase you will use the following Multiverse tools:
- Read USD Asset -->
model.usd&uv_over.usd - Write USD Override -->
mat_assign_ns_over.usdormat_assign_shadingnetworks_over.usd
# Rigging
Rigging uses as input the model.ma from Maya.
The rigging task is to:
- build a skeleton rig made of joints and controls
The output or rigging is:
- A Maya file
rig.mathat is used by Animation to animate e.g. a character. The rig is also passed to a pipeline process called Anim Cache.
In the Rigging phase you should not need any Multiverse tools.
Note
The joint skeleton hierarchy and skin weights for matching a Mocap session is done in the Mocap phase.
# Animation
Animation uses as input data the model.ma file generated by Modeling and the
rig.ma generated by Rigging.
The animation tasks are:
- animate characters for each shot
- animate attributes
The outputs of animation is:
A Maya file containing animation curves only
animcurves.maNote
It is also possible for Animation to generate USD files containing shot animation, these typically contain animated points ("P" data) as a sparse override to be used as a layer (
animpoint_attr_over.usd). This process should however be automated in the caching phase (see below).
In the Animation phase you should not need any Multiverse tools as all your data will be Maya data. You could set specific attributes that you plan to write custom attributes in this phase.
# Animation Caching
Animation contains a step called animation caching.
This is a pipeline process where rig.ma, model.ma and animcurves.ma are
taken as input and an animation cache is written as a output by Multiverse.
This cache typically contains animated points ("P" data) as a sparse
override to be used as a layer (animpoint_attr_over.usd). This is passed to
Construct Asset.
The animation caching step is:
- to write a USD file containing animated points and animated attributes which is to be used in Construct Asset.
TIP
As mentioned in the modeling section, normals ("N" data) are not necessary if your geometry will be rendered as a subdivision surfaces: Multiverse skips writing N data in such cases.
To perform animation caching you will use the following Multiverse tools:
- Write USD Asset (sparse) -->
animpoint_attr_sparse_over.usd
OR
- Write USD Asset -->
animpoint_attr_over.usd
# Mocap
Note
This section only covers Mocap resolved by USD skinning: no animation curves exist in USD, and skinning of the USD mesh is resolved on the fly by USD skeletons with linear blending according to the painted skin weights attributes. In the traditional mocap workflow there is no USD: the acquired mocap data is typically cleaned up and imported in Maya as "animation curves" to be then blended with keyframe animation. Only at this point it can be written to USD as Anim Cache. The USD and traditional mocap workflow solve different needs that go beyond the scope of this documentation.
Mocap uses as input data the Maya model in rest_pose (model.ma) generated by
Modeling and the skeleton animation USD files (skel_anim.usd) coming from a
mocap tool such as Vicon Shogun.
The Mocap tasks are:
create a static Maya joint hierarchy that matches the one of the animated mocap data. Then bind the joints to the Maya model, paint the joint weights and output it as a USD file
skel_model.usd.establish a relationship between a the
skel_model.usd(which was generated in the previous) and theskel_anim.usddata in MEOW. Then write it as a composition.For both see the skeleton workflow.
The outputs of mocap are:
- a USD file that contains the Maya model with the joints hierarchy binded and
weighted (
skel_model.usd). This is an intermediate output and is not passed to another step in the pipeline, typically. - a USD composition which is the result of establishing a relationship between
the
skel_model.usdgenerated by mocap itself and theskel_anim.usdcoming from Vicon Shogun. This file is passed to Construct Scene and to crowd FX for and to the asset construction.
In the mocap phase you will use the following Multiverse tools:
- Write USD Asset -->
skel_model.usd(can also be written as sparse override). - Read USD Asset -->
skel_model.usdandskel_anim.usd - Write USD Composition -->
mocap.usd
# Construct Asset
Asset construction can be done manually or it can be fully automated via pipeline scripting.
Asset construction uses layering to compose sparse overrides over the model: typically each asset will consist of a single Multiverse Compound node with multiple layers, for an animated character it could look like:
mat_assign_ns_over.usd OR `mat_assign_shadingnetworks_over.usd` (from Lookdev)
uv_over.usd (from Modeling)
animpoint_attr_over.usd or animpoint_attr_sparse_over.usd (from Animation)
model.usd (from Modeling)
2
3
4
or
mat_assign_ns_over.usd OR `mat_assign_shadingnetworks_over.usd` (from Lookdev)
uv_over.usd (from Modeling)
mocap.usd (from Mocap)
2
3
Once layered, it is consolidated manually or by the pipeline scripts as a single USD file (by writing it as a composition):
asset.usd
The Asset Construction tasks are:
- read in the various layers
- consolidate an assets into a composition
The outputs of Asset Constructions are:
a single USD file representing the asset to be used in a shot,
asset.usd, which is passed to Construct Scene and to FX.Note
Construct Scene can also interchange USD data with:
- Game Engines such as Unreal and Unity
- Other DCC applications where Construct Scene and Lighting could be performed, such as Houdini, Katana and Clarisse.
- The Apple ecosystem, which can natively read USDZ files for AR purposes.
In the Construct Asset phase you will use the following Multiverse tools:
Read USD Asset -->
model.usd,mat_assign_ns_over.usd,uv_over.usd,animpoint_attr_over.usdWrite USD Composition -->
asset.usd
# FX
FX is typically done in Houdini. FX takes as input USD data coming from Modeling and Construct Asset. These are uses for destruction, fracturing, scattering, instancing, cloth sim, fur sim, crowds and many other sim-like tasks. FX returns to Maya USD files which are then used as layers or independently.
The FX tasks are:
- collect the needed USD files from Modeling and Construct Asset
- perform a large variety of FX tasks
- provide back the data to Maya by writing out simulations as single USD file or file-per-frame sequences of USD or single USD files.
The outputs of FX are:
- either a single USD file or a file-per-frame sequence of USD files for the fx that is passed to Construct Scene.
- single or file-per-frame VDB files that are passed to Lighting and Compositing.
FX are done typically outside of Maya and you will use the following Multiverse tools in Maya when interchanging with FX:
- Write USD Asset -->
fx.usd(fx can be written as multiple layers too, for example you could have a fracture sim file for all geom and write the transformation for each piece as a sparse override). - Read USD Asset -->
model.usd,asset.usd,mocap.usd
:::tip::: Note that it is possible to import USD as Maya data on an item level from MEOW, this allows for example to fix some cloth inter-penetration from FX directly in Maya and allow to write a new usd asset / layer with the new "fixed" geometry. See: importing usd data as maya geometry
# Construct Scene
Scene Construction (and layout) gathers the inputs generated previously (as well as data generated in other Layout Apps such as Clarisse and Houdini): this can be done manually or the pipeline has scripts to automate this.
Typically each asset will consist of a Multiverse Compound node coming Construct Asset, from Mocap and from FX:
asset1.usd
asset2.usd
asset3.usd
mocap_anim.usd
fx.usd
2
3
4
5
These could also be consolidated manually or by the pipeline scripts as a single USD file (by writing it as a composition):
scene.usd
Overrides can be always defined and consolidate in new Composition.
The scene construction tasks are:
- read in various assets, mocap data and fx
- copy, instance, point instance via MASH and particle instancers
- perform (animated) affine transformations on the assets and write them as USD overrides to be layered and composed.
- read USD data from Houdini
- consolidate multiple assets into compositions
- consolidate groups of composed asset into larger compositions
- consolidate the whole scene into a composition
The outputs of scene construction are:
- one or more USD files representing the scene where a shot takes place
- an actual USD file representing the shot itself
In the layout phase you will use the following Multiverse tools:
- Read USD Asset -->
asset.usd,mocap.usd,fx.usd - Write USD Override -->
asset_over.usd - Write USD Composition -->
comp.usd
# Lighting
Lighting receives USD files from Construct Scene and Maya files (referenced,
therefore with namespace) from Lookdev, the Maya files only contain material
shading networks. Lighting also received .vdb files from FX.
Material shading networks are Maya-referenced into the Maya scene for lighting so that material assignment, that is specified in the USD files as a override can be resolved.
The lighting tasks are:
- read the constructed scene
- create lighting setups
- perform test renders
- choose different variants
- create material/attribute shot-based overrides used as layers
- submit final renders to rendering
The outputs lighting and rendering are:
- Maya scenes for Maya-batch rendering (3Delight, Arnold, Redshift, Renderman, VRay).
- Renderer-specific files for standalone rendering -->
.nsi,.ass,.rib,.vrscene.
In the layout phase you will use the following Multiverse tools:
- Read USD Asset -->
scene.usd - Write USD Override -->
shot_over.usd - Write USD Compositions -->
shot_comp.usd
# Rendering
Rendering is another important step in the pipeline as its the end point of data collection: USD files, VDB files and Textures.
Rendering receives either Maya files, if you are rendering through Maya "batch" (and which can be rendered with all supported renderers), or it receives renderer-native files which can be rendered by the standalone command line rendering executables:
- 3Delight (.nsi) via the
renderdlexecutable - Arnold (.ass) via the
kickexecutable - Renderman (.rib) via the
prmanexecutable - VRay (.vrscene) via the
vray.binexecutable
TIP
For 3Delight NSI Multiverse offers the special feature of rendering embedded USD shading networks.
You should always prefer rendering native-renderer files rather than Maya files via Maya batch, for a large variety of reasons:
- faster rendering, since the scene translation is already done
- more memory will be available, since Maya Batch won't be allocated in memory
- prevent the need of checking out a Maya license when executing Maya batch on the cloud, in case you are not under Maya subscription (see: here (opens new window) )
- a more lean pipeline
- a more scriptable pipeline
- a more portable pipeline
In any case thanks to Multiverse procedural rendering, even when rendering Maya files via Maya batch you can still benefit from having small Maya files and small translation time as no heavy data is contained in Maya files (heavy data is only stored outside of Maya in USD, VDB and Textures).
WARNING
Due to Redshift limitations command line rendering with Redshift is not currently possible.
:::note Note
With 3Delight you can also render using 3Delight Cloud, both via Maya or Maya
Batch by choosing 3Delight Cloud in your Maya Render Settings, and also via
3Delight standalone using the renderdl -cloud executable.
:::
# Compositing
Compositing receives rendered images generated by the renderer, however 3D compositing with Nuke 12+ may also receive USD files generated by this workflow as well as VDB files, and that is why we are mentioning it here.
For questions and customer support please email support@j-cube.jp.