# Write USD Asset
INPUT → Selection of Maya transform/shape node(s)
OUTPUT → USD asset file (.usd/.usdc/.usda/.usdz)
Write an input selection of static or animated Maya transform and Maya shape nodes, which are typically organized in a hierarchy, to a USD file on disk. The output file will contain the relative static or animated USD geometries, attributes and relationships organized in a USD hierarchy. We call this file a USD “asset”.
Once written out, USD data can be streamed back in Maya in a Multiverse compound node. When selected, a Compound can be inspected in the MEOW UI. The USD hierarchy in MEOW will match 1:1 the source Maya hierarchy that can be seen in the Maya Outliner.
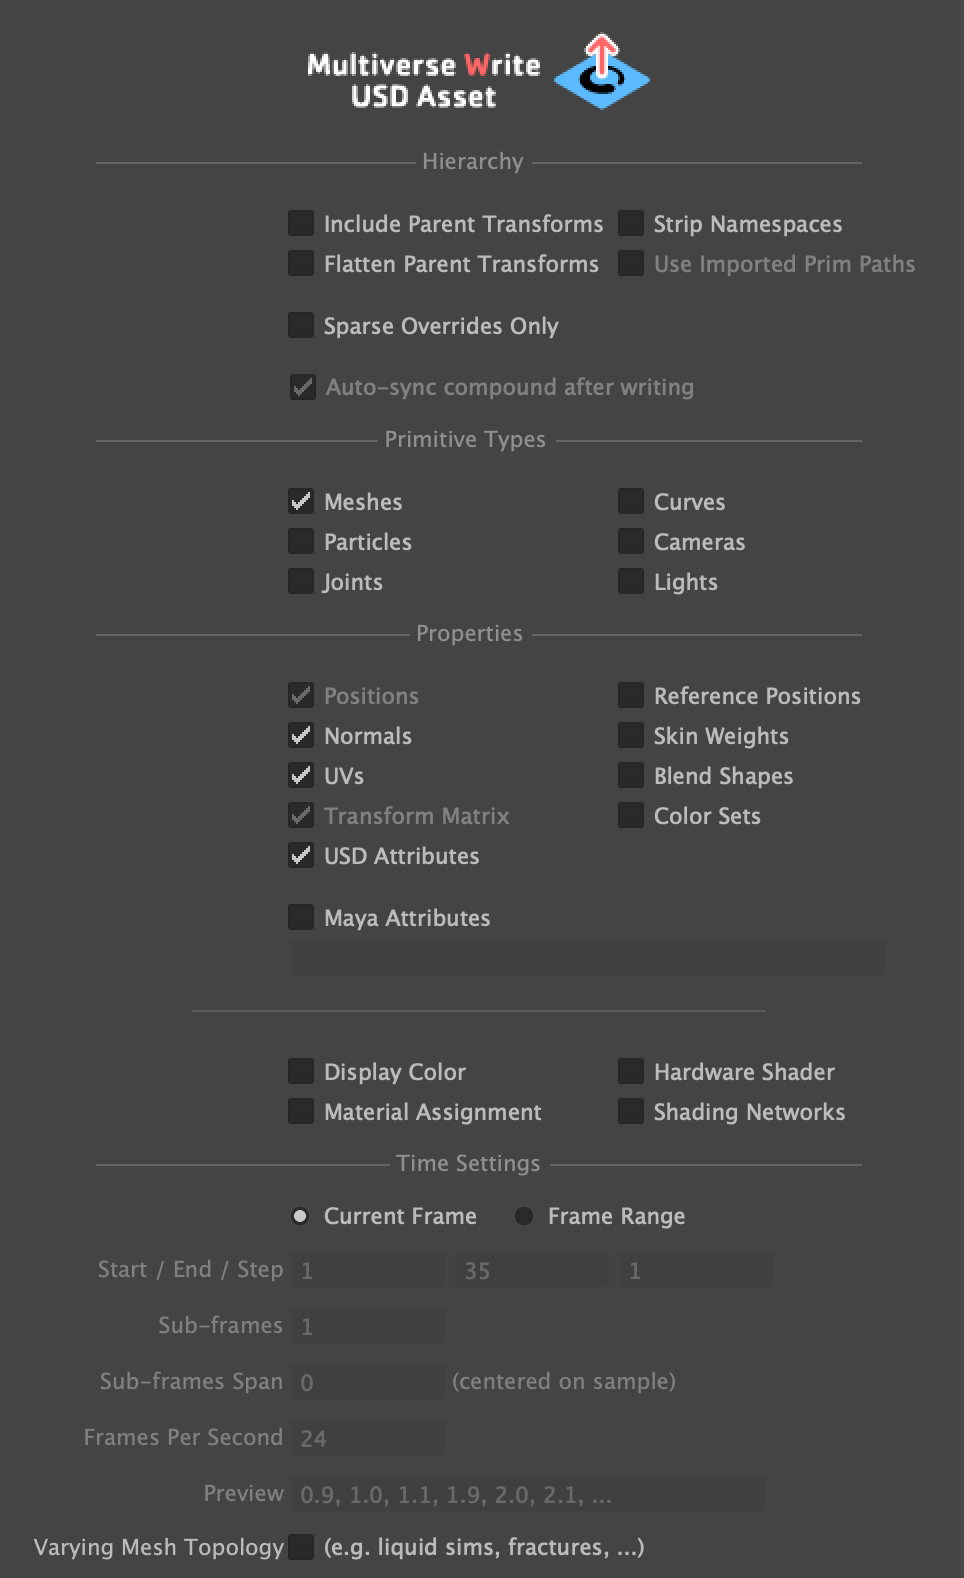
The writing process is highly customizable with option to selectively write hierarchy, primitives and properties. Use the time settings to output a static or animated asset.
Depending on the selection and the presence of mvSet nodes, you can also write
out proxies and variants.
TIP
Writing assets is also available through the Multiverse Python API:
multiverse.WriteAsset
Note that writing assets via API exposes some additional advanced options that are not available from the UI, namely:
mergeTransformAndShape(bool, default:false). Merges transform and shape nodes, matching DCC Apps hierarchies that don't have such distinction, e.g: Houdini.customRootPath: (string, default:''). Allows to specify a custom root node path rather than using the hierarchy expressed in Maya outliner.nodeTypesToIgnore: (string, default:''). A comma-separated list of node types to be ignored.
See the relative API documentation.
Heads up!
Be aware that when performing a multiple selection before writing, if you do not have the "Include Parent Transforms" option ON in the writer UI, you will then create USD files with multiple USD “roots”.
# Input Selection
A selected hierarchy of Maya transform and shape nodes. By default the writer will include any children node from the selection downstream, optionally you can include the parent hierarchy, or flatten its transforms to the current selection.
NOTE — If Maya geometry is contained in Multiverse Set nodes with the tags of "proxy", "render" and "guide" purpose set, then the asset will contain such geometries> Generating Viewport Proxies.
# File Output
By default, when no extension is typed, this will write a single .usd binary
file.
You can also explicitly type the extension:
.usdbinary file — default in case you don't type an extension..usdcbinary file — exactly the same as.usd: there is no valid reason to specify a.usdcextension, simply use.usdif you want to write binary files..usdaASCII file — ASCII files should only be used for inspection and for debugging purposes..usdz— this will write a single.usdzarchive file possibly containing textures as well (if you have authored with USD Preview Materials). We call this an “AR asset”.Note
.usdzfiles are used for augmented reality in the Apple ecosystem such as on iOS and macOS, see the relative doc USDZ output for AR. You can also read back USDZ fees in Maya using the Multiverse Read USD (or via the Multiverse Python API).
Typically you will read it back in Maya via the Multiverse Read USD (or via the Multiverse Python API) to be used as-is or to be written out again as part of a “composition” via the Multiverse Write USD Composition.
Alternatively you can read this USD file in any other USD-enabled DCC application such as Houdini (Solaris).
In a multi-stage workflow you can leverage from writing multiple layers separately. For example you could write a T-pose character model, UVS, animation, material assignment and material shading networks as separate USD files on disk, and then read them in separate layers in a Multiverse Compound.
Additionally you can write only certain attributes at a finer grain level using the "sparse data" writing options. For example you could write separately animated P and N data without the need for topology, or UVs or other properties.
# Sparse Overrides and Layering
You can write a USD file containing e.g. only certain type of data, such as only UVs, animated positions, material assignment, shading networks, transforms… and then layer them up in a Multiverse compound. This workflow is typical of large studios where different departments are responsible for different data. Such strategies allow for e.g:
- model artist writes a new USD file containing UVs only which a lookdev artist needs: the lookdev artist will simply layer this UV-only cache in Multiverse Compound and automatically get the new UVs in a non destructive manner.
- animator writes a new USD file containing animated point positions only which shot artist needs: the shot artist will simply layer this animated P only cache in Multiverse Compound and automatically get the new animation on top of the older one or on top of a T-Pose in a non destructive manner.
- layout writes a new USD file containing animated transform positions only which scene assembly artist needs…
- lookdev writes material assignment and/or material shading networks
- etc.
# Static / Animated Asset
Using the Time Settings you can either write:
- Static assets — This is a single USD file, with a single frame containing a single “sample” of data (at the current frame in Maya) which will persist through time.
- Animated assets — This is a single USD file, with multiple frames (for a frame range you can specify) each containing either a single “sample” of data per frame, or multiple “samples” of data per frame.
# Writing Skeletons, Weights, Skinning
You can write static or animated Maya skeleton data to USD. This will include: joints and painted weights for skinning.
These are few examples of the data you can write:
- Skinned character with weights
- The Maya skeleton hierarchy must not include any intermediate non-joint node
- Maya Geometry and skeleton hierarchies must be separate
- Geometry and skeleton should be grouped under a single root
- Selection: the root group (transform)
- Write settings:
- joints: on
- skin weight: on
- meshes: on
- time settings: depending if you want a T-pose or an animation
- Skeleton-only character
- The Maya skeleton hierarchy must not include any intermediate non-joint node
- Selection: the root joint
- Write settings:
- joints: on
- time settings: depending if you want a T-pose or an animation
# Writing Imported Data
See the Import USD data as Maya data documentation.
# Reference
| Section | Parameter | Description |
|---|---|---|
| Hierarchy | Include Parent Transforms | By default the write command writes starting from the selected node in the hierarchy and below. This option includes also all the parent transform locations, from the selected node up to the top of the hierarchy. |
| Flatten Parent Transforms | Upstream transforms will flattened as a transform in the currently selected node. This option is mutually exclusive with the previous one (Include Parent Transforms). | |
| Strip Namespaces | Strip any namespace from the written nodes. | |
| Sparse Overrides Only | By default the Multiverse Writer always writes “positions” (P) and “transform matrix”. Turning this on will allows to write “sparse overrides”, meaning you can write a USD file containing e.g. only animated positions, or only transforms, only UVs and then layer them in a Multiverse compound. This workflow is typical of large studios where different department are responsible for different data, e.g: one artist may output a new USD file containing only UVs, or new animated point position only (animation) or new transforms only (layout) etc. | |
| Use Imported Prim Paths | When on, this options allows to write back into USD any eventual (USD) data that has been imported in Maya via the mvUsdImporter. Data can be written in full or sparsely. | |
| Auto-sync Compound after writing | Automatically layer imported data written with the previous option in its related Compound | |
| Primitives | Meshes | Write Maya polygon meshes. If the “smooth mesh” option is active, the data will be also tagged as a subdivision surface and any subdivision creases (vertices, edges and corners) will be written in the USD file. |
| Particles |
Write Maya nParticle nodes. The following attributes will
be written: acceleration, mass,
opacity, opacityPP, particleId,
position, radius, radiusPP,
rgb, rgbPP, velocity.
| |
| Curves |
Write Maya pfxhair, stroke and
nurbsCurve nodes.
| |
| Joints | Write Maya joints | |
| Cameras | Write Maya cameras | |
| Lights | Write Maya directional, area and
point lights.
| |
| Properties | Positions | Actual position data of each point for each primitive. |
| Normals | Write normals data | |
| UVs | Write (multiple) UV sets. Note that Multiverse automatically renames the main (current) uv set to `st` so that it can be correctly interpreted by USD. | |
| Color Sets | Write (multiple) color sets | |
| Tangents | Write tangents | |
| Reference Positions | Write Pref | |
| Blend Shapes | Write Maya blend shapes (including inbetweens) - only the first blend shape deformer will be written. | |
| Skin Weights | Write skin weights | |
| Transform matrices | Transform data. | |
| USD Attributes | When enabled, this option will write all USD attributes which were added on supported Maya shape nodes (mesh, nParticle, pfxHair, Stroke) and on Multiverse Compound shape nodes. | |
| Write Maya Attributes | When enabled, this option allows to write a comma-separated list of Maya attribute names: these are any Maya attribute added on Maya nodes that can be added e.g. via the Attribute Editor's [ Attributes > Add Attribute ]. | |
| Display Color | Write the color attribute to use when drawing in the viewport (this attribute comes from the actual color attribute of the assigned Maya material). You should always write this. | |
| Hardware Shader as Preview Materials |
Write StingrayPBS hardware shaders as USD Preview Material. In order for
this to happen the StingrayPBS needs to be either assigned directly to a
Maya shape(s) ot connected to the .hardwareShader parameter
of any Maya material (render-agnostic). As the name suggests this is for
Viewport Preview only and for interchange: preview materials are not
rendered by the supported renderers.
| |
| Material Assignment | Write material assignment information between a Maya shape node and a Maya shading engine node (a.k.a. "shading groups"). AMaterial assignment is a "relation" to a primitive and can be either a Maya material or an "embedded" USD material encoded when writing with the Shading Network option below. | |
| Shading Networks | Write Maya shading networks to USD files encoded natively to USD via the USDShade schema. Note that shading networks of any render engine can be written (for interchange purpose), and that shading networks can be exclusively rendered procedurally with 3Delight NSI. Note that Shading Networks and Material Assignment can be written separately if desired for pipeline workflows. | |
| Time Settings | Current Frame | Write a single “sample” of data at the current frame. This produces a static asset. |
| Frame Range | Write a single “sample” or multiple “samples” of data for the specified frame range. This produces an animated asset. | |
| Start | The first frame to write | |
| End | The last frame to write | |
| Increment | Write every 1 frame or every n-frames according to your n-increment. | |
| Sub-frames | How many “samples” to write for each frame (they will be equally spaced). | |
| Sub-frames span | From the center of the frame, how large is the interval span for each “sample”. | |
| Frames per second | Writes the desired frames per second / timecode per second in the header of USD files. | |
| Preview | A preview of your time samples. | |
| Varying Topology | If you are outputting a frame range where your topology is varying between samples (e.g. a fracture or a liquid simulation etc.) turn on this option. |